Friday, September 2, 2016

Etsy Store is Live!

I've been making bib and burp cloth sets like crazy, stocking a shelf in a downtown Clover store and my Etsy store at www.pressedclovers.etsy.com. But that means I have some cute things that will make most anyone happy. 


I've really enjoyed slling these, finding unique or adorable fabric, and gifting them to all the babies!


So handy, just wash, dry and you are ready to use again. 


Visit my etsy shop www.pressedclovers.etsy.com for much more selection!

Monday, April 11, 2016

NICU isolette covers

I know I've posted about the isolette covers before - these are for babies born early who are in incubators, fighting to survive. The incubators/Isolettes are designed to control the baby's environment. It also amplifies noise. So these covers help reduce light and noise, creating a "womb-like" environment as much as possible. 

My mom made a set for my brother's twin boys. Then I wanted to make some in honor of them. And my church picked up on it... And now it's time to donate!! So excited!! 

I'm hoping I kept pictures of each one I made...


Hrm. I thought I'd made ten but I only have pics of nine!! Looks like I'll have to make one more before Friday when we deliver these :) (obviously I can't count. There are ten here!!)


This is a simple pattern mom came up with after making the ones for my nephews. 45" wide OR width of fabric. This pattern should cover about any isolette. The bottom fabric should be dark. I used prequilted black, I used batting and quilted myself, and I just used thick fleece to back some. 

And the tops are cotton or flannel. It doesn't really matter. 

I can't tell you how thankful I am God gave me this opportunity to give back to those most vulnerable in our communities.  And how appreciative I am of those who did this before me so my nephews had donated covers before my mom made them their own. 

I made A LOT of mistakes. Seriously crooked lines. Puckers in the fabric. White thread on black fabric. But these sweet babies do not care. Promise!! So don't let that stop you from trying this! 

Wednesday, March 2, 2016

Adapting a Pattern

When my good friend Paulene told me she was expecting, I knew I wanted to create something very special for her baby girl. I did burp clothes and bibs, but I really wanted to do a quilt... I call them floor quilts. 40" x 40" and great to toss in the floor for baby to play or nap. 

My friend started the hashtag #RainbowBabyCruse. So it just made sense to incorporate a rainbow, but how? I have no idea how I found this persons blog, but her pattern seemed something I could do! And her quilts are beautiful!  

http://fortworthfabricstudio.blogspot.com/2014/09/arrows-aweigh-boy-quilt.html?m=0


Go check out her pattern and blog. 

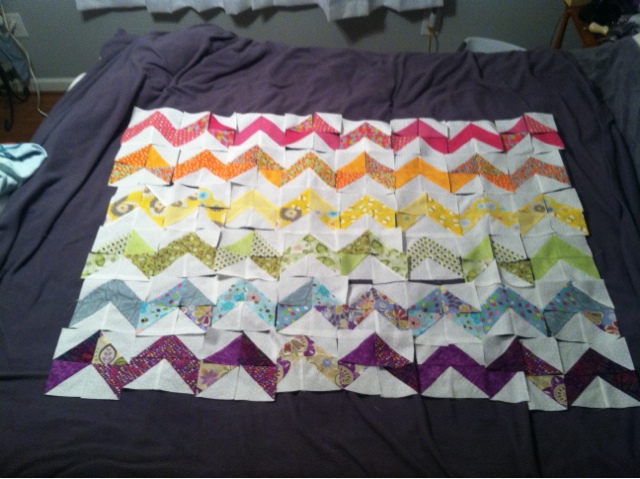
So I started wondering how to make chevrons into rainbows. And I can't cut straight worth anything but the charm packs didn't have enough in the rainbow colors I needed. So a last minute trip to the store and lots of wavy lines later, I figured out what I wanted to do. 


I started with a solid chevron, then a mix of the pink colors, another solid another mix etc. So I had four patterns of fabric in each color. And four solid chevrons and four mixed chevrons in each color. But the quilt wasn't long enough. 


So I added white strips between each color to expand the length. I didn't bind it, I sewed right sides together and flipped it out. It was a bit wonky but I still liked it. 


I backed it in this adorable flannel, then quilted around the chevrons on each side. You can tell I hadn't quilted yet in this picture. 


And here she is, opening it!! So happy I was able to create something handmade for such a talented, crafty, and special friend. Can't wait To meet her precious baby girl, soon I hope! 

And I had to share my quilt with you because I am that excited I managed to create something so cute! ;) 

Sunday, January 31, 2016

NICU Isolette Covers

So many volunteer or donation opportunities aren't known about until a specific situation impacts your life. My brother a sister-in-law prayed for a child for so long and God blessed them with two! Identical twins, Liam and Kellan. However, they were delivered at 28 weeks and spent 2.5 months in the NICU at our local Children's hospital. (NICU stands for Neonatal Intensive Care Unit). Thank The Lord above for these people who work in the NICU!  

Having no previous experience with the NICU, none of us knew about isolette covers for the incubators the babies live in. These covers make their habitat dark and muffles the noise from the NICU, allowing for better rest and less stimulation. Basically, it recreates life in the womb as best as possible. 


My sweet nephew is under there sleeping soundly. :) My mom made matching blankets for the twins but before she did, the twins were given covers that were donated by those who came before them or loving volunteers. They didn't always fit well because there are several sizes and types of Isolettes. Some were made for smaller Isolettes but were better than nothing for the boys. That's when my brother asked my mom to make some for his boys. Of course, she did. 


Since then, mom and I wanted to give back to the facility that was so important in the well-being of our newest editions. We made flyers and posted online to see if anyone else wanted to follow the very simple directions to make covers to donate. Two churches have gotten involved - including mine! - and are making covers for these precious babies! 


Trust me when I say this is flexible. So much cloth is only 42" wide - no problem. And I don't use binding, I sew mine right sides together and turn it out. Some of my flaps are larger and I'm sure some are smaller. Eh no biggie. 


My church had a "sew-a-thon" and this one came from there. Adorable farm scene! 


The tops can be pretty much anything. One piece of fabric, quilting, cotton, flannel, whatever. The underside needs to be darker to help block light. I mostly use prequilted fabric but started using thick fleece. 


Like this one - flannel in top and fleece on bottom. I didn't use batting - this was pretty thick and I hope will muffle noise. 


Flannel and fleece. 


Cotton and prequilted fabric.

The coolest thing is as people find out about this need, they have created a cover or two for the project. It just took getting the word out about the need. 

Anyway, you don't have to be a sewing genius to make these. Trust me when I say mine have horrible mistakes. But those sweet babies will not care one little bit. 

Maybe this inspires you to find a way to use your interests, talents and such to give back to your community? I hope so. There are so many needs on so many levels and any one of them would love your help. :) 

Friday, June 19, 2015

{Tutorial} Birthday Party DIY + TEMPLATE!

My family went on our annual Beach Vacation last week and it completely wore us out.  (Why do vacations do that? Just make you exhausted instead of re-energizing you??)

This is the beach where we were - totally beautiful?! Seriously - BEAUTIFUL!
Anyway, we came home on a Saturday, and baby sweet niece's birthday was the following Sunday.  And she wanted a Hello Kitty party. And we had not planned on this.

Knowing her full-scale party would be the next Saturday and it was rainbow themed, I figured I could make a run to the local dollar store and turn their supplies into Hello Kitty supplies with a little work.

I purchased:
2 accordion tissue flower decorations
1 pack of (3) hanging flower decorations
1 piece of posterboard
1 bunch of bright pink carnations
1 pk of (8) party hats
1 pk of party plates
1 pk of party napkins
1 set of HK sugar cupcake toppers
*** See Template at the bottom of the post! ***

Sweet Niece sporting her HK Party Hat!


The plain but brightly colored party hats came from Wal-Mart. Less than $2 I think. I made a template of a small HK head first, then a bow template.  I laid the bow where I thought it looked best and then made another template that included the edges of the bow on her right ear.  This will give you a place to color your bow and not have to glue a bow on.  It will be part of your template for each HK head.  I place the template face down on the backside of the posterboard, traced and cut it out. Then I used my bow template to lightly sketch in my bow on the front side so I could then color it in with markers.  Add some black ovals for eyes, a yellow oval for a nose (I outlined my nose in orange) and a few whiskers on each side and you are done! 

Once the marker dried, I put rubber cement on the back of the HK heads and on the front of the party hats, let it dry and then press together.  Dried rubber cement is one heck of a hold, so don't think you'll be pulling it off and re-positioning it - oh no, my friend. It's stuck. 

The hats are what people have loved the most. 

These decorations were from the Dollar Tree.  The blue and green tissue flowers were a dollar each. The three posterboard flowers with tinsel and dangling decorations were all three for a dollar.  So that's a total of three dollars hanging up there (no bad!!). 

The tissue decorations came with a flower you were supposed to put in the middle with a cardboard stick that would run in the middle of this poof thing. But I didn't want a flower - I wanted a HK head. Once again, using posterboard I made a larger HK head template, traced and cut.  Colored.  Used a drinking straw that I cut about an inch down the length in four places to splay out like four arms.  I taped this to the back of the HK head, leaving about 2 inches sticking up and one inch taped to the head.  The sticking up part went into the center of the tissue decoration, which let the HK head be flush against the tissue flower.  I have a feeling this isn't making sense, let me take a pic and show you really quick. 

Does that make more sense now? This nub sticking up will go in the middle of the tissue decoration. 


 The flat flowers had pictures of flowers drawn onto them.  That was so easy to cover up by gluing an HK head right over, making sure I covered up all the flower petals.  The dangling butterflies and lady bugs matched the plates and napkins I picked up at the dollar store, so I left those on.  

I did try to make a mask with white felt, glued to a party hat, but it didn't start low enough down her face.  She ended up looking like a cat unicorn. Cute idea, but not executed well. So that decor was a party #fail. But I still like this cute picture. :) 


Lastly, I used another drinking straw and two HK heads, glued together back to back with the straw in the middle to go inside the flower arrangement.  I found the carnations in bright pink, pink, and white for $5 at Wal-Mart. Mom snipped a few flowers from her yard that perfectly match and added to it (Daisies, Queen Anne's Lace and Cone Flowers).  Sweet Niece enjoyed spotting HK in the middle of the flowers. :) 

I didn't take a pic of the store bought cupcakes and the sugar cupcake toppers, but that wrapped up the HK madness. She loved it, I loved making her happy, and there was just enough HK to make it feel like we planned it all that way. :)  Hope this might spark some ideas for your own DIY birthday! :)

OK - Because I know folks want a template for Hello Kitty heads and bows, I'm including one here!  Feel free to download this picture, and do with it what you will.  I left the nose and bow uncolored for you to fill it in.  Or, use the bow image for a little "Pin the bow on the kitty."  Feel free to share what you make with me - I would love to see it (and feature it here!)  beth.covington at gmail.com 


Tuesday, May 5, 2015

{Tutorial} Kids' Artwork as Gifts

Do you remember the toddler artwork I featured earlier on this blog where my 2-year-old niece painted the background of four canvases and I added LOVE to them?  This is the same concept, except using both of my nieces!  They worked together to make a beautiful painting for my sister for Mother's Day - a very special gift that she will treasure.


I bought a pack of 16 x 20 canvases at Hobby Lobby (my favorite craft store) for super cheap.  Loaded up on acrylic paint, brushes, palettes, and water bowls. We were ready to rock.  The 2-year-old used three shades of blue for the background and went to town painting.  Once I convinced her painting her knees wasn't a good idea - to just stick with her hands - we got things moving.  Baby niece used a large craft paint brush and her hands to cover the canvas.  We flipped it around a few times to get all the white area covered (and helped just a little).


While baby niece was painting, teen niece used the back of wrapping paper to draw an artistic Palmetto Tree.  Next: cut it out, dry the massive amount of paint baby niece used on the canvas, and use the wrapping paper tree as a template, lightly tracing the tree onto the canvas in pencil. CAREFUL: you don't want to poke a hole in the canvas or make too dark of a mark.


Teen niece painted over the outline with dark blue...


Filled it in and then got crazy artsy with it. By mixing colors she had shades of blue for dots inside the tree.  She added a crescent moon in the corner, and gray "moonlights" to one side of the tree.  White/yellow dashes in the gray just to make it interesting.

She did such a good job, I love all the fun and unique things she added that created texture and movement to the piece.  Love it!


Since teen niece will be at her mom's house for Mother's Day, we celebrated a week early and surprised my sister with this coolness! She's a SC History teacher and she LOOOOOOOOVED it.  (For you non-South Carolinians, the Palmetto Tree is part of our state flag.  We are very proud of it!)
The best part is this gift is nice enough to be displayed in the living room; both girls feel a sense of pride and "ownership" in seeing their talents displayed in the house and for creating something so nice for their mom/stepmom; and my sister treasures a gift from her girls.


I really do encourage you to try it and share your experience with me! I'd love to see what you create.  Please don't think it has to be perfect - that's part of the special uniqueness of the artwork! Just let them go for it and see their pride when it's all complete. :)

Wanna pin it? Use this:


Wednesday, April 8, 2015

Painted Pottery

I had to wait to post until I gifted this new craft - it's a hand-painted over-sized mug! LOVE these types of things and the size is perfect for soup, cereal, whatever you wanna chow down on. A new paint pottery place opened up about 35-45 minutes from me and I had to try it out. And try it out. And try it out! This is the most recent piece I completed and gifted to my friend in Alabama when I went to go visit with her.


The cool thing about this place is they save the dried up paint from where people have squirted out too much paint for their object and turn it into paint chips. Then you can apply a layer of wet paint and "glue" the chips to your pottery.  When the paint is unfired, it looks NOTHING like what it does once it is fired, so you really don't know what colors the paint chips are - it's just a luck of a draw kinda thing.  So I knew I had to use that obnoxious yellow green, wanted it pair with blues and figured - heck, the paint chips can't make it any weirder looking so let's go for it!

I'm so glad I did because I LOVE IT! The paint chips melt down the curve of the mug and just makes such a cool effect.  My niece tried it on her pottery - one piece was a flat cross and one an owl figurine.  The cross paint chips melted but made colored spots where they were.  Only in the places with lots of chips in one small space did they mix together.  Her owl figurine had the colors melting together as they ran down the curve of the owl's back, so it was really cool.

On the outside I etched swirlies just to make it cute and girlie.  They aren't super noticeable but I'm still glad I didn't try to paint them on. That would have made  mess, I think.

Anyway, you can always use Pintrest for tons of ideas on what to paint on all types of pottery - from your child's handprints and feet prints, to just trying your hand at something that interests you.  If I find some more pics from our painting trips, I'll come back and post them here.  Until then - go try your hand at some creativity! :)